Physical Address
304 North Cardinal St.
Dorchester Center, MA 02124
Physical Address
304 North Cardinal St.
Dorchester Center, MA 02124

Learn these 15 brilliant camping hacks using everyday household items that will completely transform your outdoor adventures in unexpected ways.
You’ve probably never considered that your everyday dryer lint can become one of the most effective fire starters in the wilderness. When you’re planning your next camping trip, you don’t need expensive gear or complicated gadgets to solve common outdoor challenges. Simple household items you already own can transform into game-changing tools that’ll save you money, space, and frustration. These clever workarounds will revolutionize how you approach camping preparation and help you tackle unexpected situations with confidence.
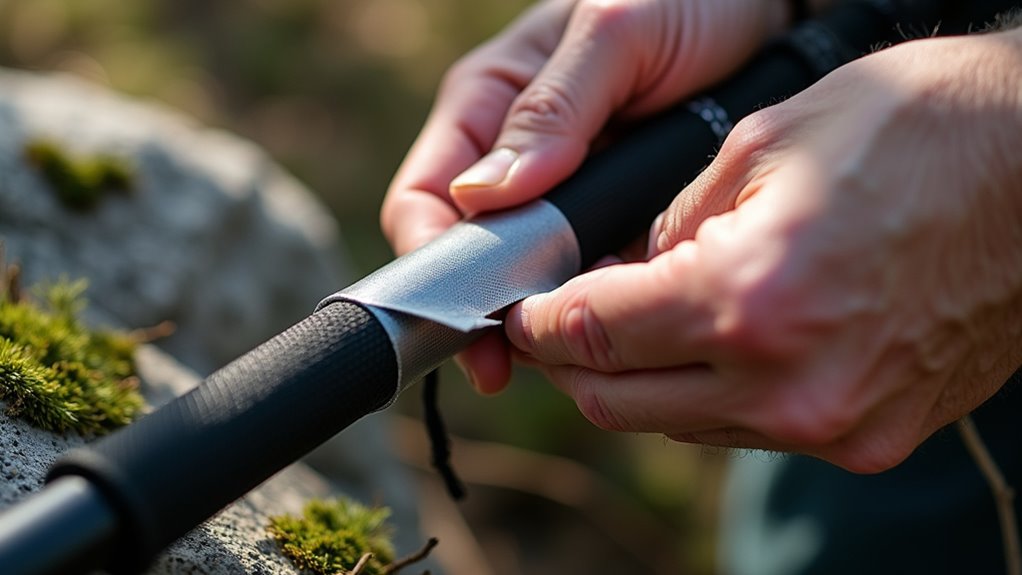
When you’re trying to pack light for your camping trip, every ounce matters – and that bulky roll of duct tape can quickly eat up precious space in your backpack.
Here’s a brilliant solution: wrap duct tape directly around your trekking pole’s shaft. You’ll save space and weight while keeping this essential repair tool accessible.
Transform your trekking pole into a smart storage solution by wrapping duct tape around its shaft for space-saving emergency repairs.
Start by cleaning your pole’s surface, then carefully wrap the tape around a straight section, overlapping slightly for secure adhesion. Aim for 10-15 feet – enough for most emergencies without adding bulk.
The tape won’t interfere with your pole’s function, and you can easily unroll what you need.
This hack transforms dead space into storage, letting you carry duct tape without sacrificing room for other gear. Smart packing strategies like this help you enjoy affordable camping without compromising on essential supplies.
Why spend money on expensive fire starters when you’ve got everything you need at home? Dryer lint and petroleum jelly create incredibly effective fire starters that’ll ignite even in damp conditions. Simply collect lint from your dryer filter and mix it with a small amount of petroleum jelly until it’s thoroughly coated. Form small balls and store them in a waterproof container.
Before you head out, consider what camping style best suits your needs, as different approaches may require varying amounts of fire-starting materials.
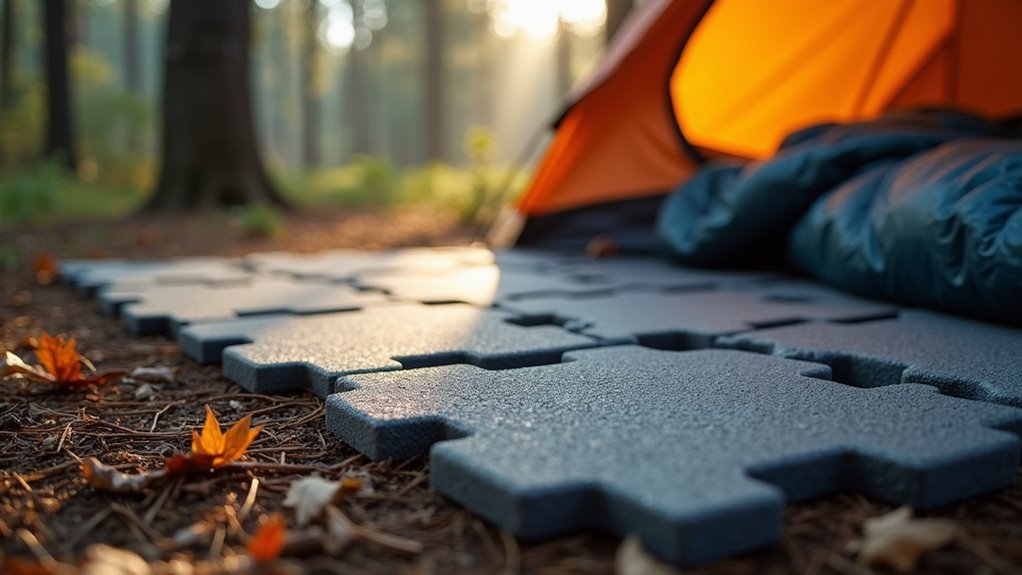
Since sleeping pads can cost upwards of $100 and add significant weight to your pack, foam floor tiles from the hardware store offer a brilliant alternative that’ll keep you warm and comfortable for a fraction of the price. These interlocking tiles typically cost under $20 for a pack and weigh considerably less than traditional camping pads.
You’ll find them in the flooring section, usually sold as exercise mats or garage floor tiles. Cut them to your desired size using a utility knife, creating custom shapes that fit your tent perfectly.
The closed-cell foam provides excellent insulation from cold ground while cushioning pressure points. They’re also waterproof and virtually indestructible. Pack multiple pieces to create modular sleeping surfaces, and use extras as camp chairs or gear protection.
This clever hack ranks among the most practical camping gadgets that can transform your outdoor experience without breaking the bank.
If you’ve ever struggled with harsh headlamp beams that create annoying shadows around camp, you’ll love this simple trick that turns your existing light into a soft, ambient lantern. Simply strap your headlamp around a translucent water jug with the light facing inward. The water diffuses the harsh beam into gentle, 360-degree lighting that illuminates your entire campsite without blinding anyone.
Transform your harsh headlamp into a soft, ambient lantern by strapping it around a water jug with the light facing inward.
This hack works with any clear or semi-clear container you’re already carrying. The water acts as a natural diffuser, creating warm ambient light perfect for cooking, socializing, or reading. Whether you’re planning Andes adventures or local weekend trips, this versatile lighting solution adapts to any outdoor setting.
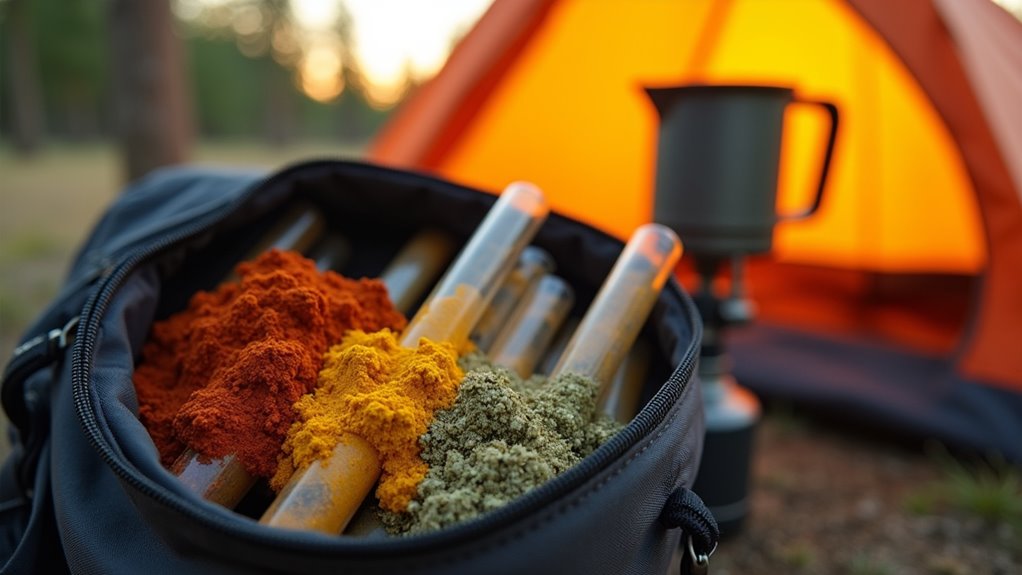
When you’re trying to minimize pack weight and maximize flavor, plastic drinking straws become your secret weapon for carrying spices. Simply seal one end of a plastic straw with pliers or a lighter, pour in your favorite seasonings, then seal the other end. You’ll create lightweight, waterproof spice packets that won’t burst in your backpack.
Cut small notches in each straw and tear to open when cooking. Label them with permanent marker or colored tape for easy identification. This method works perfectly for salt, pepper, garlic powder, or custom spice blends.
You’ll save money compared to buying expensive camping spice containers, and these straws take up virtually no space in your pack while keeping seasonings fresh and dry. This same budget-conscious approach applies when deciding whether renting or buying makes more sense for other outdoor gear like boats for fishing expeditions.
Ever wondered why you keep tripping over tent guy-lines in the dark? Pool noodles aren’t just for swimming—they’re perfect camping safety tools! Cut colorful pool noodles into 3-4 inch sections and slide them onto your tent’s guy-lines.
These bright foam markers create visible barriers that prevent nighttime stumbles and twisted ankles.
You’ll save money compared to expensive reflective guy-line markers, and pool noodles cost under $2 each. They’re lightweight, weatherproof, and won’t damage your gear.
Just like having reliable camping water filters ensures safe drinking water, these simple visibility markers help keep your campsite hazard-free.
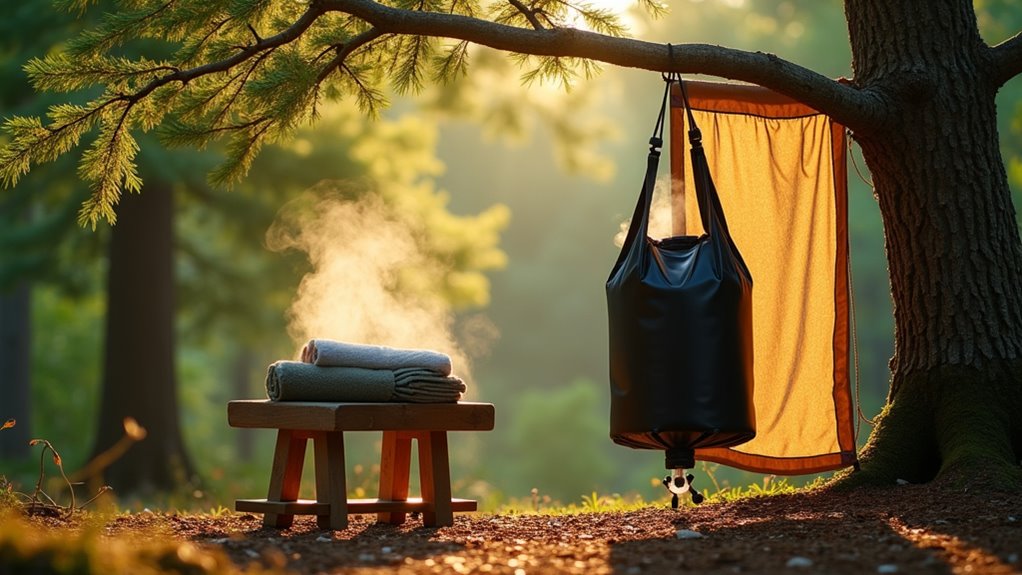
While commercial camp showers cost $50-100+, you can create an effective solar-heated shower system for under $15 using a simple water storage bag.
Purchase a 5-gallon black water bag from camping stores or online retailers. The dark color absorbs sunlight efficiently, heating water to comfortable temperatures within 2-3 hours of direct sun exposure.
Hang the bag from a sturdy tree branch or camp shower stand using the built-in handle. Most bags include a basic shower head attachment with an on/off valve for water flow control.
Position the bag 6-7 feet high for adequate water pressure.
Fill the bag in the morning and let it heat throughout the day. You’ll have enough warm water for a 5-minute shower, perfect for washing off trail dust and sweat.
This setup works particularly well for motorhome enthusiasts who want to extend their off-grid camping capabilities without relying solely on their vehicle’s water system.
Before you toss those empty toilet paper rolls into the trash, consider repurposing them as waterproof kindling containers for your next camping trip. These cardboard tubes make excellent fire-starting storage that won’t cost you a dime.
Simply stuff dryer lint, shredded paper, or birch bark inside the rolls, then seal the ends with duct tape or aluminum foil. The cardboard itself becomes part of your kindling when you’re ready to start a fire.
Pack several in your camping gear for reliable fire-starting material that stays dry.
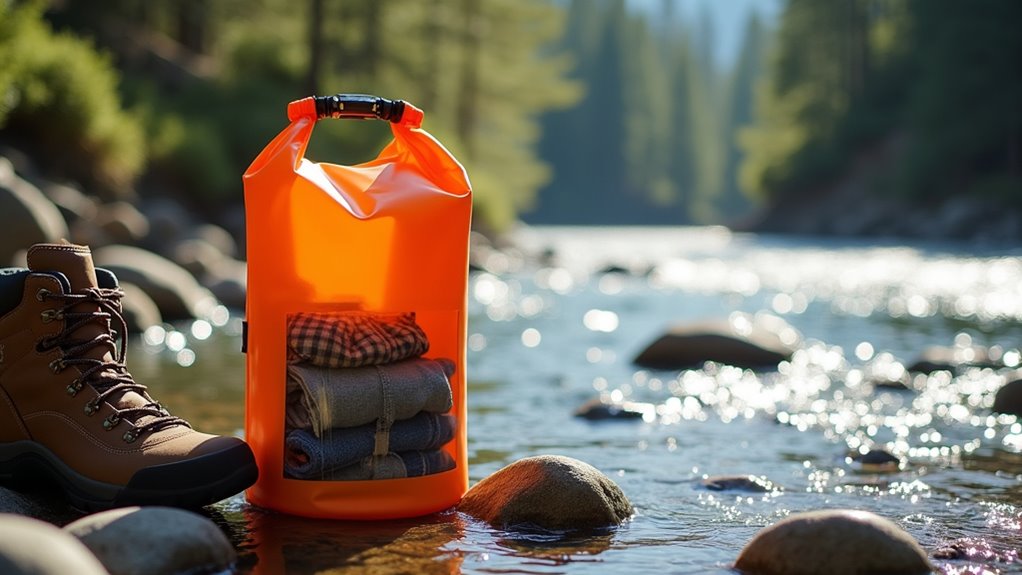
When you’re camping for extended periods, keeping clothes clean becomes a real challenge without access to laundry facilities. Here’s where a simple dry bag transforms into your portable washing machine.
Add your dirty clothes, biodegradable soap, and water to a waterproof dry bag. Seal it tightly and shake vigorously for several minutes. The agitation mimics a washing machine’s action, cleaning your garments effectively.
After washing, drain the soapy water and rinse with clean water. Squeeze out excess water and hang clothes to dry. This method works best for lightweight items like underwear, socks, and t-shirts.
A 10-liter dry bag costs under $15 and handles multiple garments. You’ll save money on laundromats and keep your camping clothes fresh throughout your adventure.
This portable laundry solution is especially valuable when using different camping tents that may have varying amounts of interior space for storing clean clothes.
Your car sunshade pulls double duty as an excellent reflective ground tarp that’ll keep you warmer and drier during camping trips. The reflective side bounces your body heat back up while the waterproof material creates a moisture barrier between you and damp ground.
Simply place it reflective-side up under your sleeping pad or tent floor. You’ll notice the difference immediately – especially on cold nights when ground temperatures can sap your warmth. This budget-friendly hack transforms a $10 car accessory into essential camping gear.
Don’t forget to pack a water bottle with hydration tracking features to monitor your fluid intake while enjoying your warmer, drier campsite setup.
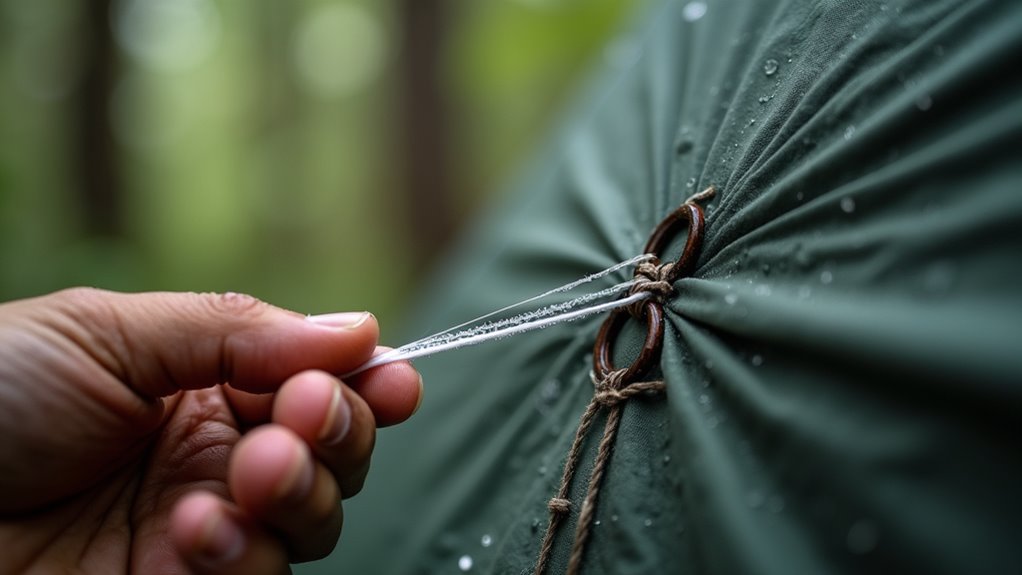
While most campers overlook it, dental floss ranks among the strongest and most versatile emergency cordage you can pack. You’ll get incredible tensile strength from something that weighs practically nothing and costs under two dollars.
Use unwaxed floss for gear repairs, securing tarps, or hanging bear bags. It’s perfect for sewing torn fabric, fixing broken zippers, or lashing tent poles together.
Pack multiple small containers instead of one large roll—they’re easier to distribute throughout your gear. In emergencies, you can use floss for fishing line, tripwires around your campsite, or even emergency sutures if you’re trained.
The compact size means you’ll never sacrifice precious pack space, yet you’ll have incredibly strong cordage when you need it most. This lightweight cordage proves especially valuable for glacier climbing expeditions where every ounce matters and reliable gear repairs can be critical for safety.
Before you head out on your next camping trip, freeze water in sturdy, leak-proof bottles or bags to create multipurpose ice packs. You’ll keep your food cold while ensuring you’ve got backup drinking water as the ice melts. This eliminates the need to buy expensive gel packs that can’t be consumed.
Use thick zip-lock bags or repurpose plastic bottles you’d normally throw away. Fill them three-quarters full to allow for expansion during freezing. Place these frozen containers in your cooler around perishables.
Once your ice melts and you have fresh water available, you can use the empty containers to store ingredients for simple camping meals during the rest of your outdoor adventure.
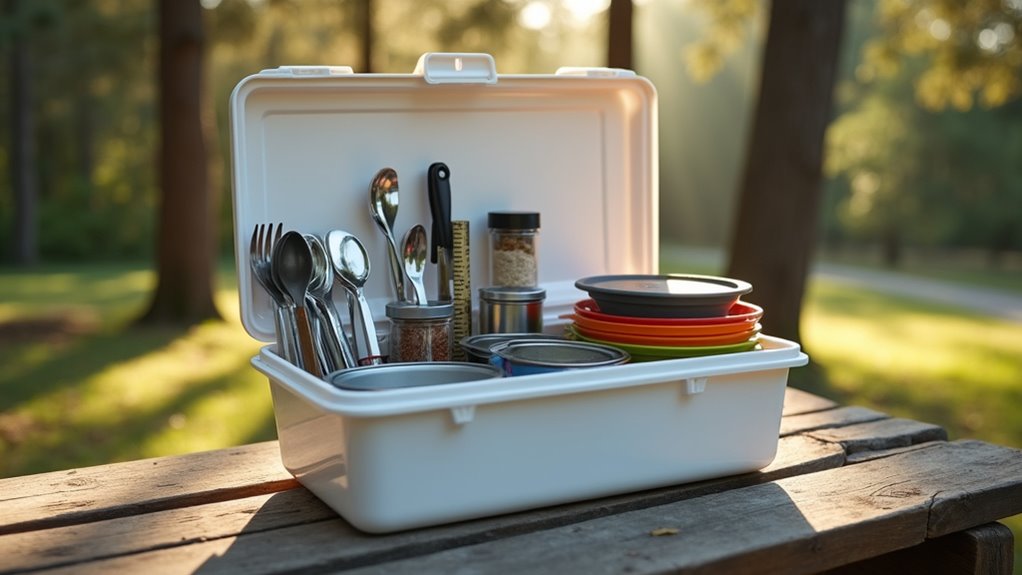
Just as you’re maximizing your ice packs, you can transform an ordinary plastic storage container into a complete portable kitchen that’ll keep all your cooking gear organized and accessible.
Transform any basic plastic container into your complete portable camp kitchen for organized, accessible cooking gear on every outdoor adventure.
Choose a medium-sized container with a secure lid. Pack your essentials: lightweight pots, utensils, can opener, cutting board, and spices in small containers. Use dividers or smaller boxes to prevent items from rattling around during transport.
Mount a paper towel holder inside the lid using adhesive hooks. Attach a magnetic strip to hold knives safely. Store dish soap, sponges, and trash bags in ziplock pouches.
This setup costs under $20 and saves countless minutes searching for scattered cooking supplies. You’ll have everything centralized, protected from dirt, and ready to deploy at your campsite instantly. Pair this portable kitchen with a folding camping table to create the perfect outdoor cooking station for meal preparation and dining activities.
Empty baby wipes containers often become the unsung heroes of camping gear organization. You’ll discover these waterproof containers protect your essential items from moisture, dirt, and damage while keeping everything accessible. They’re free if you’ve got babies around, or you can grab them cheaply at thrift stores.
These containers work perfectly for storing various camping necessities:
The pop-top lids seal tightly, creating excellent waterproof storage that’ll survive unexpected downpours or accidental creek crossings. Whether you’re exploring Maine’s Vacationland or any other destination, these versatile containers will keep your gear organized and protected.
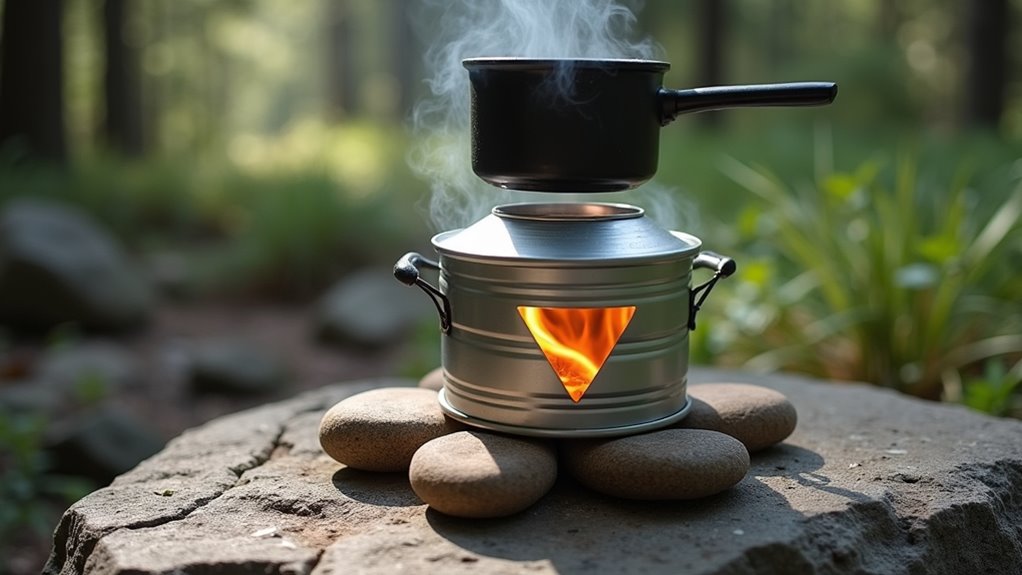
When you’ve finished your last cup of morning coffee at home, don’t toss that metal can—it’s about to become your new favorite piece of camping equipment. With just a can opener and some creativity, you’ll transform that coffee can into a versatile camp stove that costs practically nothing.
Punch several holes around the bottom edge for air circulation, then create a larger opening on one side for feeding fuel. You can burn small twigs, pine cones, or even crumpled newspaper inside. The metal walls contain the fire while the top provides a stable cooking surface for your pot or pan.
This DIY stove works great for boiling water, cooking simple meals, or keeping food warm. It’s lightweight, reusable, and won’t break your budget. While you’re setting up your cooking area, consider positioning your camping hammock nearby for easy access to meals and a comfortable spot to relax between adventures.
You’ve now got nine game-changing hacks that’ll transform your camping experience without breaking the bank. Here’s something that’ll motivate you: studies show campers who use DIY gear modifications spend 40% less on outdoor equipment while increasing their comfort level markedly. Don’t let expensive gear keep you from exploring the outdoors. Start implementing these budget-friendly solutions today, and you’ll discover that the best camping innovations often come from your own creativity and household items.